
British Pub-Style Pickled Onions
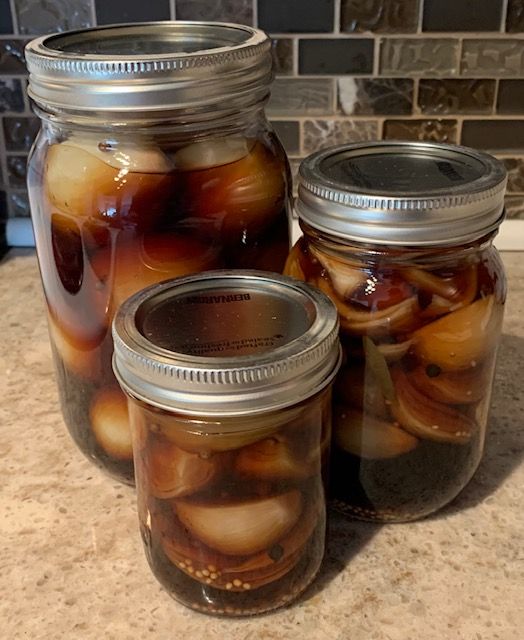
I first attempted this preserve at my father’s request. It turns out that pickled onions are not popular fare in North American stores - who knew? After the initial batch I was convinced that the malt vinegar pickled onion is a welcome addition to my diet and cold store room. At the right time of year a few dollars will bury you in onions so why not preserve a bunch? And, a little onion goes a long way. I have packaged these in 2 cup and 1 quart containers. The larger size satisfies the onion addicts in my family but the 2 cup containers are a friendly quantity for any refrigerator. These are best eaten on a salad or with crackers and cheese. I have also used them to pep up soups and stir-fry. The main taste profile is onion and vinegar so however they are eaten expect a powerful sour flavor. In this amateur’s experience I believe these onions pair best with something spicy and/or savory.
Prerequisite: Access to a kitchen with a stovetop and sink.
Process Summary
Peel Onions - 20 Minutes
Prep the Jars - 15-30 Minutes
Make the Brine - 10 Minutes
Package 15-30 Minutes
Utensils

Stock Pot (12 quarts or larger)
Trivet
Strainer
Measuring Cup (1 cup)
Cutting board
Chef’s Knife
Large Mixing bowl
4 Quart Pot
Glass Preserving Jars – enough for about 10 quarts of volume
Preserving Jar Lifter
Ladle
Canning Funnel
Paper Towel or Drying Cloth
Oven Mitts
Metal Soup Spoon
Ingredients:

10 pounds small onions
½ cup salt
3 ¾ quarts quality real malt vinegar
⅔ cups honey
2 ½ cup granulated sugar
1 ½ Tablespoon whole coriander seeds
1 ½ Tablespoon mustard seeds
1 Tablespoon whole black peppercorns
10 whole cloves
10 bay leaves
Instructions:
Skin the Onions
WARNING: Boiling water and steam can scald. Use caution when taking the lid off a pot of boiling water. Do not overfill.
1. Fill the stock pot with water, about ½ full.
2. Use the stove to boil the water in the stock pot.

3. With a chef's knife and cutting board, carefully slice off the ends of each onion. Place the trimmed onions in the large mixing bowl.
4. When the water is boiling, turn off the heat.
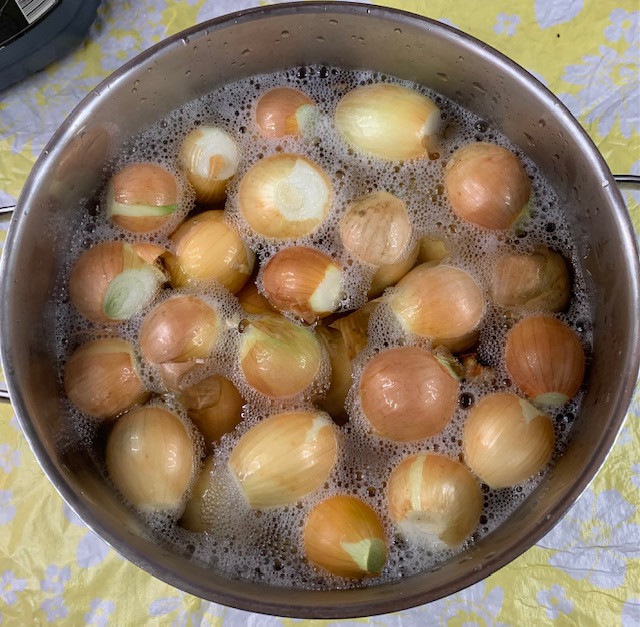
5. Carefully place the trimmed onions into the stock pot. Let sit for 1 minute.
6. Place the strainer in the sink to catch the onions and drain the hot water away. Carefully drain the hot water through the strainer.
7. Rinse the onions with cold water.

8. The peels should easily come off the onions. Carefully, use the chef's knife to remove any remaining peel. Discard the peels.
Prepare the Jars

1. Gather several preserving jars that amount to a volume of about 10 quarts.
2. Purchase new lids and rings that will fit the preserving jars.

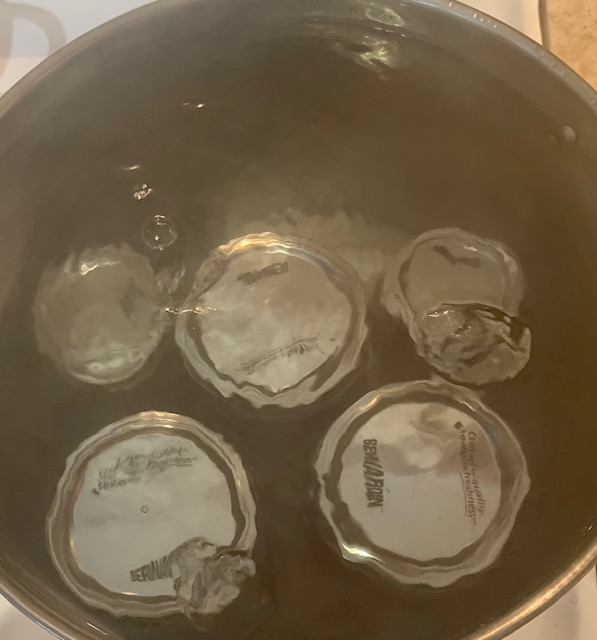
3. Wash the lids and rings with soap and water and set aside.
4. Fill a large pot with water, about ⅔ of the way and bring to a boil.
WARNING: Boiling water and steam can scald. Use the preserving jar lifter to handle jars in boiling water bath.

5. Using the preserving jar lifter slowly submerge the lidless jars in the boiling water bath. Leave the jars in the hot water bath for 10 minutes. If all jars do not fit repeat multiple batches to sterilize all preserving jars.

6. After 10 minutes, use the preserving jar lifter to remove the jars from the hot water bath. Set the jars aside to cool.
Make the Brine

- In the 4 quart pot, mix together the salt, granulated sugar, coriander seeds, mustard seeds, peppercorns, cloves and bay leaves.

- Pour the malt vinegar and honey into the pot.
- Heat the pot to a rolling boil.
- Gently stir the mixture until all ingredients are combined.
- Turn off the heat.
Package
CAUTION: Over-filled preserving jars may not seal correctly and spoil. Only fill the jars to the level of the lowermost ring of the metal screw cap.

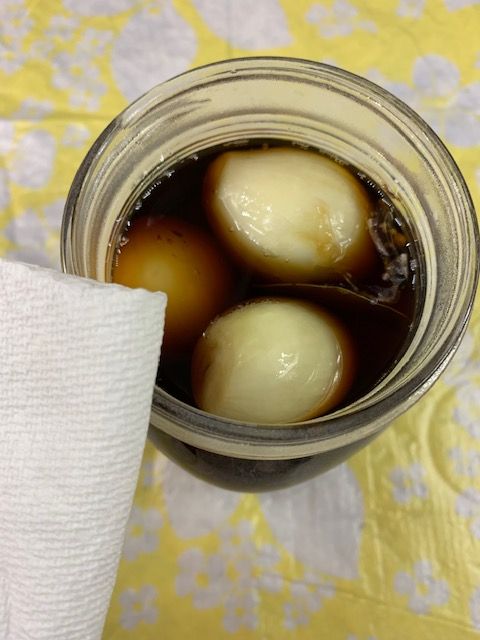
1. Use the canning funnel and slotted spoon or strainer ladle, deposit onions into all of the preserving jars.

2. Use the canning funnel and ladle to pour brine into each of the preserving jars. Only fill the jars to the level of the lowest ring of the metal screw cap.
CAUTION: Touching the inside of the lids might contaminate the jar and cause the jarto spoil. Be sure to wash your hands. Avoid touching the inside of the canning lids.
3. With a clean paper towel dry the rim of the canning jar

4. With a clean paper towel dry the rubber ring on the underside of the jarring lid.
5. While gripping the jarring lids at their edge to avoid touching the underside carefully place the lids on the mouth of the preserving jars.
NOTE: If the metal ring fasteners are overly tight the preserving jars will not vacuum seal.
6. Gently screw on the metal fastener rings to the preserving jars. Fasten the metal ring until it is finger-tight.
7. Fill the stock pot 2/3 of the way with water. Boil the water.
WARNING: Boiling water and steam can scald. Use oven mitts for protection. Use caution when opening the pot lid and when submerging jars into boiling water.
8. When the water is at a rolling boil, use the preserving jar lifter to hold a jar by the top and slowly submerge it vertically. When totally submerged, bubbles should begin to appear from under the metal fastening ring.
9. Submerge the remaining jars. Submerge jars in batches if they do not all fit at once.
10. Leave the preserving jars in the hot water bath for 10 minutes.
CAUTION: Jars will be hot to the touch. Only handle Jars with the lifter or oven mitts.
11. After 10 minutes, use the preserving jar lifter and oven mitts to carefully lift all jars out of the hot water bath and set them aside to cool.

12. When cool, remove the metal fastener ring. Using a paper towel or cloth wide clean and dry the rim of the jar and the inside of the fastener ring. Reattach the fastener ring.

TIP: To check for a good seal the lid should be slightly deformed downward. For an added check gently tap the center of the lid with a metal soup spoon. A properly sealed jar will produce a subtle metallic frequency like a tiny steel drum. A bad seal will make a thud or rattling sound when tapped with a metal spoon. If the seal is no good simply repeat the jarring process with a fresh lid.
CAUTION: Sealed preserving jars should keep the beets for several months. Refrigerate the jars when opened and consume within a few weeks. Do not consume the contents of stored jars that have broken seals or visible signs of spoiling.