
Super Simple Storage Shelf
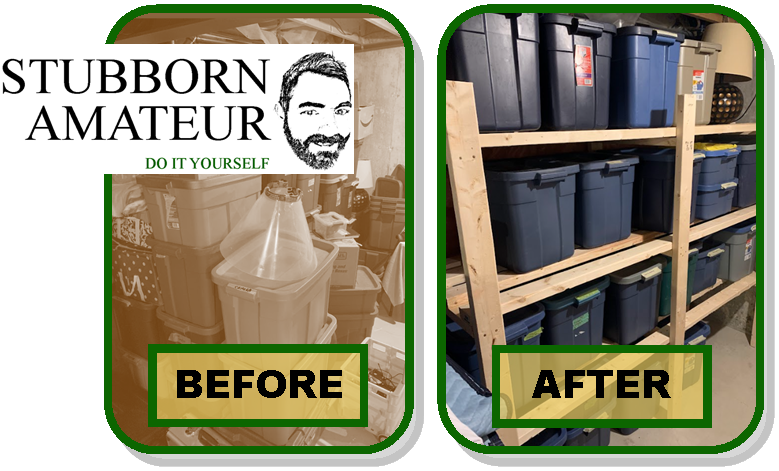
The basement needed to be reorganized and I refuse to purchase more resin shelving. I have a collection of large storage bins that stack nicely but do not fit on prebuilt shelves. The best solution is to build a basic shelf, with 3” screws and several 2x4s. This project is custom fit to the space and storage needs. This is the least expensive option and super simple.
The Plans


The shelf was designed around the size and shape of the storage bins available. After taking measurements of the storage bins I made plans to visualize the finished product. Each shelf needed 20-inches between for the storage bins to fit. I also adjusted the length of the project to fit the space. Additional support was needed in the middle of the workpiece to safely distribute any load.
Safety

Always use safety equipment when operating power tools.

Safety Equipment:
- Ear Protection
- Safety Glasses
- Respirator
Materials

- Dimensional lumber (2x4s or similar)
- 3” Screws or nails
- Measuring tape
- Pencil or marker
- Circular saw or handsaw
- Drill or hammer
- Screwdriver or nail gun
- Level
- Sandpaper (optional)
- Paint or stain (optional)
Procedure
1) Gather all materials.

2) Measure and cut the lumber to the desired dimensions.
- Cut 6 72-inches 2x4. These will be the height dimension.
- Cut 9 24-inches 2x4. These will be the width dimension.
- Cut 12 80-inches 2X4. These will be the length dimension.
3) Assemble the vertical support frame.

- Lay two of the 72-inch vertical supports on the ground with the narrow faces positioned upwards.

- Use the measuring tape and pencil to mark the wide faces of the 72-inch boards, 20-inches from the end.

- Position one of the 24-inch width dimension supports between and perpendicular to the 72-inch boards.
- Align the 24-inch support with the pencil marks.

- Use the carpenter square to align all boards, and attach the horizontal support to the vertical support with screws or nails.
- Use the measuring tape and pencil to mark the wide faces of the 72-inch boards, 20-inches above the first installed 24-inch width support. Install a second 24-inch width support between the new marked locations.
- Use the measuring tape and pencil to mark the wide faces of the 72-inch boards, 20-inches above the second installed 24-inch width support. Install a third 24-inch width support between the new marked locations.
- Ensure the frame is square by using a level or measuring diagonally from corner to corner.

- Repeat all of step 3 to construct 2 or more vertical support frames.
4) Attaches the horizontal shelves to the frame.

- With helpers or bracing, stand the vertical support frames with the 20-inch clearance at the bottom.
- Position the middle vertical support frame in the center, about 40 Inches from either end.
- Position the third vertical support frame 80-inches from the first vertical support.

- Starting from the bottom shelf, lay flat four 80-inch horizontal boards, perpendicular with the 24-inch width supports. Ensure the end of the 80-inch horizontal board is flush with the outside edge of the vertical support frames.

- Fasten the 80-inch horizontal boards to the 24-inch width board with screws or nails.

- Install the remaining 80-inch horizontal boards to the second and third shelves.

Fasten the shelf to the wall or joist for added stability. A loaded shelf might tip over and cause bodily harm or property damage.

Use 3-Inch screws to fasten additional bracing to the workpiece and the celling joist.
Optional
- If desired, sand the surfaces of the shelf and edges to remove any roughness or splinters.
- Apply paint or stain to the shelf according to your preference. Allow it to dry completely before use.
Congratulations

A super simple shelf takes minimal planning, increases storage capacity and can be customized to any space or storage needs.
Enjoy!