
Canvas Awl Boot Repair
High quality footwear is a must in life. The products a person puts on their feet impacts posture, foot health and style. As with most outdoor clothing there is a balance between modern synthetics and time-tested natural materials. Leather is a fantastic natural material that is breathable, flexible, easy to work with and repair. Minor functional and cosmetic damage to footwear can be serviced by any amateur.
This article documents a repair on my right winter boot. With a simple canvas awl, wax thread and minimal experience I have added years of life to these shoes. I hope this article shows that we don't have to give up on damaged clothing when it begins to show wear. A little creativity and stubborn persistence can save some money and reduce waste. In my opinion, there is a modest beauty in the uniqueness of hand-crafted products made of quality materials. This story seemed worth sharing for anyone considering a similar project.
The Problem

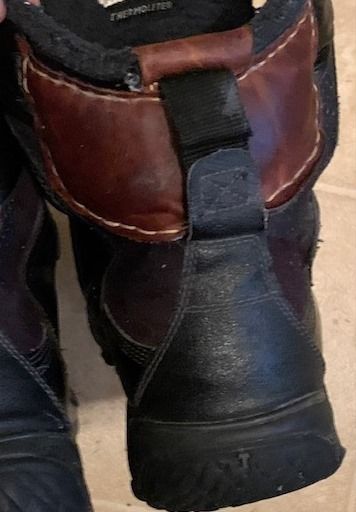
This is the second major repair for these boots. In Winter 2021 the boot strap loops on both heels popped their seams. I reinforced the ankle material in the boot with a rectangular patch of scrap leather. The boot strap loop was reattached to both heels by stitching through the strap webbing and the leather patch folded over the ankle of the boot (pictured above).
The current problem is not due to the previous repair. The photo shows quality patch work on the boot heel that has weathered a full Canadian winter. These boots are their own testimonial for the quality of this repair job. It worked so well last year that when I noticed a tear in the faux leather upper I decided to repeat the process - and this time document the experience.
Materials

Scrap Leather - Purchased at a craft store or reclaimed from used clothing.
Marker or fabric pencil.
Leather scissors - Pictured above are small tin snips that made easy work of the leather.
Waxed Thread - Purchased at a craft or fabric store.
Canvas Awl - Purchased from a hardware store.
Stitching

1) Hold the scrap leather up to the boot to estimate the size and shape of the required patch.

2) Use the marker or fabric pencil to draw a shape onto the scrap leather suitable for the patch. Add about ⅛ of an inch for a seam allowance. Use the scissors to cut out the patch.


3) Position the patch on the workpiece. For this project the patch had to fit under the boot strap loop. I made the patch large enough to stitch into the stronger suede leather below the faux leather.


4) With the scissors, trim the end of the waxed thread to allow for easier threading of the canvas awl.

5) Pass the waxed thread through the hole in the awl handle. Pull through about 10 inches of thread.

6) Loop the waxed thread around the pin on the outside of the canvas awl handle.
7) Pass the waxed thread through the wooden groove that leads to the head of the canvas awl. Pull through about 10 inches of thread.

8) Loosen the chuck at the head of the canvas awl and pass the wax thread through the metal groove below the needle. Pull through about 10 inches of thread. Tighten the chuck.

9) Pass the waxed thread through the eye of the needle and pull through about 10 inches of thread.
TIP:
The length of stitching that can be made depends on the length of thread that has been passed through the needle. At this point I have pulled through 10 inches of thread which means that the length of this row of stitching will be 10 inches or less.
CAUTION:
Stitching with a needle can cause injury to your fingers. Work-gloves provide some protection. Be mindful of finger position when pushing the needle through the workpiece. Do not to push the needle into your own fingers! Have first aid supplies near buy in case of injury.

10) In one hand hold the workpiece and in the other hand position the canvas awl for the first stitch. Ensure your fingers are not directly in front of the needle.
11) Firmly press the canvas awl through the patch and boot.

12) Identify the loose end of the waxed thread and pull it all through. Draw through enough thread for the estimated length of stitching.
13) Carefully, withdraw the canvas awl.

14) Position the needle of the canvas awl for the first stitch. For this project I tried to make the stitch length about ¼". There are tools to assist with stitch spacing. I have found that eyeballing simplifies the process.
15) While ensuring your fingers are not directly in front of the needle, firmly push the canvas awl through the workpiece.

16) This is the tricky part. Once the needle is through the workpiece, pull the canvas awl back ¼” so that the waxed thread loosens into a loop.
17) Keep one hand on the canvas awl handle to support the workpiece. Use the other hand to pass the free end of the waxed thread through the loop on the side of the needle closest to the previous hole.

TIP: Add a needle to the free end of the waxed thread to make stitching a little easier.

18) With one hand on the canvas awl and the other on the workpiece, pull the awl back and out.
19) Tighten the stitch by pulling the loose thread on the inside of the workpiece and the thread at the end of the needle.


20) Repeat steps 14-20 around the edge of the patch.


21) For this project I needed to pass the awl and thread spool through the boot strap loop to make a single row of stitches. It would have been possible to skip this step if I had started a second row of stitches on the other side of the boot strap.
22) Continue the row of stitches all the way around the edge of the patch.

23) When the row of stitches is complete use the awl needle to tease a loop of thread out of the second to last stitch on the outside of the workpiece. Pass the awl needle and thread through the loop.

24) Cut the thread off the canvas awl and tie a knot in the final stitch.
25) Trim any excess thread.

Sealing

26) Use a leather seal product to treat and protect the boot. This is an important step to waterproof the stitches and the leather.

27) Use a cloth or paper towel to rub the seal all over the the leather patch. Wipe of excess with a fresh cloth.

28) Apply the leather seal to all of the leather on both boots. Let dry.
29) Enjoy!